Three Palm Software announces WorkstationOne 1.9.5
Carmel, CA, 3 November 2026
The 1.9.5 release of WorkstationOne will soon be available for customer installs. Short descriptions of the changes in this release are included in the release notes which accompany the release and which are available to all customers. Short descriptions of the changes in this release are included in the release notes which are available to all customers, while highlights of selected items are included below with more detail.
Workflow
This release includes the following updates to the built-in reading workflow capabilities:
- Unlimited workflow support has been added (for details see the “Workflow generalization” section below). Previously there were implicitly two workflows, but this is now explicit (same two by default), plus the user can add more workflows.
- A new “basic” step type is available for use in workflows. The user can add this to an existing workflow or use it as part of a new workflow.
- The configuration UI for the Technician version and the button area of the screen have been updated to hide the workflow with this license (see the user manual and the “Technician license clarity” section below). This makes the user interface for the Technician version less cluttered by inactive elements. The Technician workflow model is replaced by a simple HP “picker” interface.
- The new “basic” step type has explicit policy settings for each HP to control visibility of the birads and breast density buttons.
- The logic for the ctrl-num keys has been changed to mean that the workflow jumps to step “num” rather than to a specific named step.
- Previously, save of the “markup correlator” graphic defaulted to “on” (i.e., it was saved in any gsps or SC along with markup). For 1.9.5 the default setting is “off” for new installs (i.e., this graphic is not included in screen captures by default unless the user turns that option on).
UI Changes
UI improvements include:
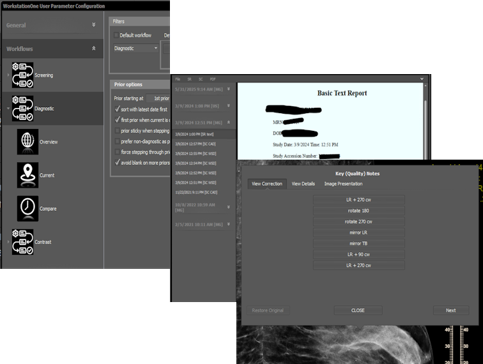
- New logos have been added for the “current” and “compare” step types.
- The “Key/Quality notes” dialog has been updated to use a “peak” style (the “peak” points to the current viewport), with an explicit “next” button to navigate through viewports. This is more intuitive than the old “drag” model, which depended on the location of the upper left corner of the dialog for viewport selection (see the “Image corrections” section below).
- There have been improvements to the display of text from GSPS – the bounding box corner is now selected based on the specified alignment (in the GSPS) and any re-orientation required for display (e.g., if the user has left-right flip set).
- QR dialog – patient name fields are disabled for user input when name matching is turned off. Use of the patient names in a query is configurable on the user query dialog, so this makes it obvious what option the user has set.
- The style of the “save with jpeg” dialog has been updated to match other application dialogs.
CAD/AI Display and Interaction
This release builds on the CAD/AI support that was previously expanded in the 1.9.4 release. Changes include:
- Lunit support (mass+calcs)
- CAD score#1 updated to {1,3:##0}
- Ignore certainty units for marks
- Marks now drawn as outlines
- New logos
- b-rayZ finding text has been simplified to handle untyped details.
- The code is changed to avoid repeated logging of warnings when an unknown concept is found in a CAD-SR.
- DeepLook – interactive (decision support) now uses their new API (replacing the original TCP/IP version). The Deeplook context menu has been updated to reflect small changes in the exposed functionality.
- DeepHealth AI support has been expanded to support 3 new pseudo-vendor encoding options for the SR (part of the iCAD assimilation).
Plugin Changes
Changes to the bundled plugins include:
- The “Compare” plugin now auto-loads at least one viewport when a case is opened.
- The “Compare” plugin has been upgraded with a simplified study navigation UI.
- The “NM” plugin viewer has been updated to support NM images from CMR.
- Simple viewers (plugins such as “US”, “MR”, “DOC”, etc) now default to “pan one” with a right mouse drag action.
- A new “Documents” plugin is included. This plugin displays a timeline with all PDF/SR/SC documents together (see the user manual and section “Documents plugin” below). This plugin can replace the previous (and still supported) separate plugins for those modalities.
Worklist Companion
Changes to the worklist companion tool include:
- When this tool is run as administrator (and so has write permission to the config folder), then the saved settings are stored as “master settings” transparently. The master settings are then assumed by regular users, who see those as “read only” connection definitions (a regular user can still add new connections, but cannot change the master set).
Performance
The following changes have been implemented to improve performance:
- The association wait mechanism for the storage SCP has been optimized to avoid timeout for a sender, resulting in fewer retries and faster single-association transfers.
- Latest versions of toolkits such as dcmtk 3.7.0 and IPP 2026.0 have been incorporated.
Back-end
Changes to the back-end (Windows Service for communication tasks) include:
- SerializeAll default changed to “false” – which means by default that messages can be handled out of order (which can help responsiveness).
- The “delete patients” action now avoids triggering the internal watchdog while making progress on slow deletes. This is achieved by batching deletes, so that the client – e.g., the UI – is notified after each batch (previously the client was only notified at the completion of all requested deletes, which could take some time).
- AdapterPeer – the system now silently removes definitions with blank hosts (a common misconfiguration, which previously resulted in extra messages in the logs).
- AdapterTcp – trace logging of any message that is determined to be invalid is now truncated to a maximum length (previously there was no check, so there could be a lot of garbage printed to the trace file if the input was corrupt).
- AdapterHttpListener – more trace messages are now recorded by default to better help future configuration problems.
- Windows power events are now logged in the back-end trace file. These may be useful in future for tracking down problems.
- Enterprise interface now has a native ViewCaseAccessionNumber method which allows native (as well as emulator wrappers) to open cases based only on their accession number.
- The “Launcher” script now supports opening a case via accession number even when configured to use the REST interface (previously this was only achievable by use of a wrapper such as the http-listener adapter).
Service
Changes to service tools include:
- There is now an explicit setting on app-config (license tab) to allow a trial (or lease) license to operate as a technician license. Previously this option was only available by use of a permanent license key.
Expanded Highlights
Workflow generalization
A key advantage of WorkstationOne compared with competing products is the emphasis on reading efficiency. One part of this efficiency is the reading workflow, which guides the reader through a case from opening until report generation (which may be external). Previously the default workflow was called the “Viewing sequence” which is followed automatically for screening cases, with special adaptions for “diagnostic” studies (configurably defined). The 1.9.5 release generalizes the workflow model: at a new install there are two explicit workflows – one called “screening” and the other “diagnostic” which essentially carry forward the existing model.
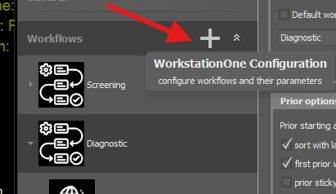
What is new is that this can be expanded to any number of workflows, with workflows selected automatically (and manually, as desired). For example, one could define a workflow for diagnostic cases with mag views, another for contrast cases, etc. While it is not necessary to define a new workflow for each type of case (as any workflow can show all images), this mechanism can provide a way to simplify reading of specific types of case and hence aid reading efficiency. If no new workflow is defined, the system operates just like it did previously (apart from name changes). With the 1.9.5 release, a new workflow is added by hovering the mouse over the “Workflows” section of the user configuration, which then shows a “+” sign:
Clicking the “+” results in a dialog that allows the selection of a “class” of workflow, with an associated (arbitrary) name to recognize it by:
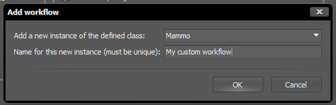
This release only supports a “Mammo” workflow type (class), but that will be expanded to other types of workflows in future releases. Selection of “OK” results in this new workflow being added to the list of configured workflows, and like all workflows it can be further customized.
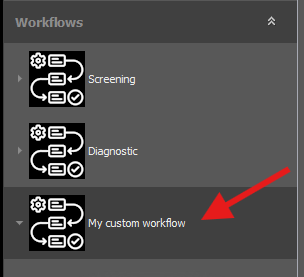
Each workflow can have any combination of “steps” within it – like with the workflow, each step has its own settings, unique to that step within that workflow.
When a case is open, the active workflow is selected automatically but can be manually changed by the user at any time. The active workflow, and the selection of any of the configured workflows is achieved using the “workflow” button at the lower right of the image screens (to the left of any steps that are configured for that workflow):

The text shown on the button is the name of the current workflow (in the above example “Tomo”, containing 4 configured steps: “Overview”, “Current”, “All Pixels”, and “Basic”). Clicking the workflow button shows a list of available (configured) workflows:
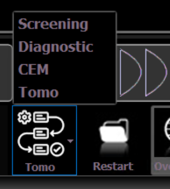
Selection of any item in that list makes that the current workflow, and changes the steps (shown to the right of the button) to the steps configured for that workflow:
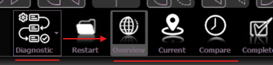
i.e., in this case selecting the “Diagnostic” workflow has resulted in a workflow shown on the right with 3 steps: “Overview”, “Current”, and “Compare”.
In addition to manual selection, the workflow is selected automatically (the normal case) when a case is opened – the selection is based on the properties of the current study.
Automatic workflow selection is configured on the user settings – using the drop-down menu below the “default workflow” selection:
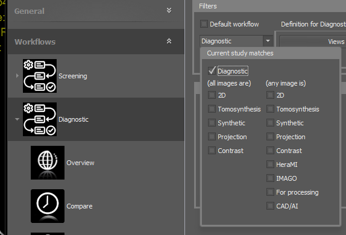
Which shows an example where the Diagnostic workflow is selected, and is not the default, but the drop-down menu below that shows “Diagnostic” – i.e., this workflow is automatically selected if the current study matches the criteria for a diagnostic study (see the user manual for more information on the diagnostic definition options).
The “current study matches” drop-down allows other types of selections – for example, “any image is tomosynthesis” or “all images are 2D” or “any image is CAD/AI”. These options (more than one can be selected for a single workflow) allow the assembly of custom workflow for different scenarios (e.g., one workflow for tomo, one for contrast imaging, etc.). Once a workflow is added and the corresponding selection criteria configured, then that workflow is automatically invoked once a matching case is opened.
Documents plugin
The 1.9.5 release introduces a new plugin called “Documents”. This plugin allows the display of SC, PDF and SR as a single timeline. It thus essentially combines the functionality of the separate “SimpleSC” (Document), PDFviewer (PDF) and SRviewer (SR) which were included in previous releases (and are still supported). For new installs, this unified “Documents” (DOCS) viewer is recommended.
The innovation for this viewer is a single timeline which integrates all documents (SC, SR and PDF) into one “list” grouped by study and sorted by dates. For example, when a particular case is open, the left side of the “DOCS” plugin instance shows:
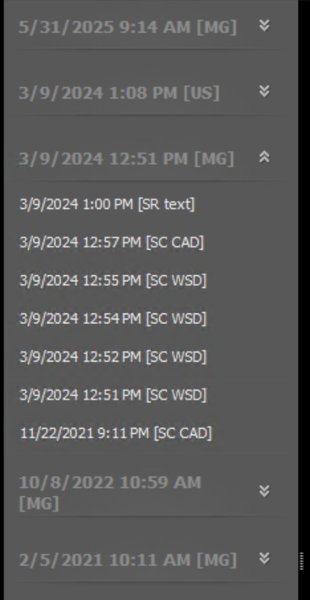
Each study with documents (SC, SR or PDF) is listed sorted by date, along with the modality (e.g., “MG” for mammography, “US” for ultrasound, etc). Below each study is a list of reports (also sorted by the time each was generated) along with a notation of their type (“SC” for secondary capture, “SR” for structured report and “PDF” for encapsulated PDF document). An indication is also given for the type or source of the document (e.g., “text” means that the SR is one that contains text, and “CAD” for SC means that it is a secondary capture from a CAD device. Hovering the mouse over a study displays additional information about that study:
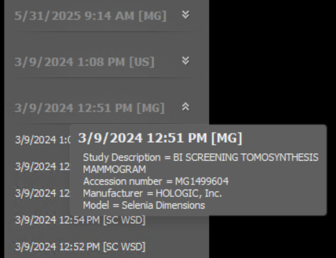
Which identifies the source for that study being a Hologic Selenia Dimensions machine. Similarly, hovering the mouse over a report displays more information about that report:
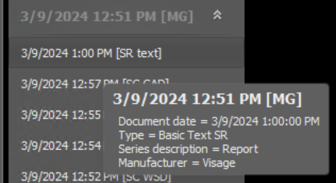
Which indicates that the highlighted report is a “basic text SR” and came from a Visage system.
Clicking any report in the list causes that report to be displayed in the main area of the viewer:
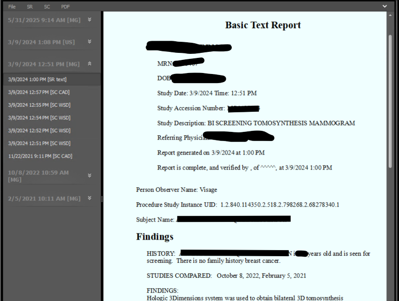
When a report is selected with the mouse on the left side, the up/down keyboard keys navigate from one report in the timeline to the next, so that it is easy to skip through the reports sequentially without having to click on each.
More information on this new plugin can be found in the user manual.
Image corrections
Image correction capability has always been available within WorkstationOne – but the user interface was somewhat daunting. With the 1.9.5 release the UI has been simplified, with the most common actions available on a separate tab, with more details available to users who want to delve into the details. This functionality is still called “Key (Quality) notes” and now shows as a peak-style dialog:
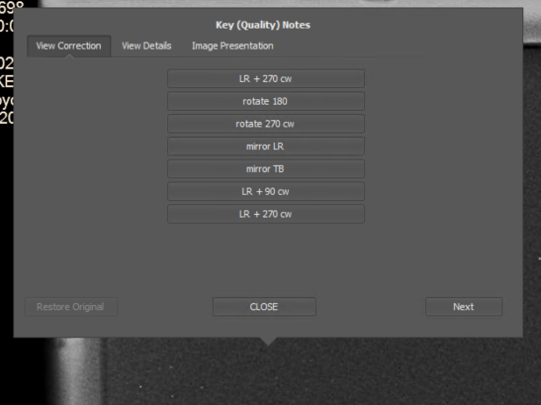
The functionality is divided into 3 tabs for ease of use. When this option is selected, the dialog “points” to the viewport it was initiated from. The “Next” button allows the dialog to automatically move to the “next” viewport in the current hanging protocol, so that corrections can be made sequentially by cycling through the viewports of the hanging protocol.
The “View Correction” tab has a simplified set of the most common actions that are performed when correcting an image. Clicking any of the buttons results in that operation being applied to the current image (e.g., “rotate 180” degrees). Internally, these options update the image headers – the “patient orientation” vectors are updated in such a way that the selected transformation would be what will be seen on the screen. For example, if the currently displayed image appears to need to be rotated clockwise by 90 degrees to be “correct”, then select “rotate 90 cw”. This results in the displayed “correction value” for “patient orientation” (see “view details”) being updated immediately. The available transformations include rotations in increments of 90 degrees and mirror (left-right and top-bottom).
More information on the advanced features can be found in the corresponding section of the user manual.
Technician license clarity
WorkstationOne has always been available with full functionality (called the “professional” version) and with reduced functionality (“technician” version). The same install has both behaviors with the license switching between the types. While the professional version is intended for radiologists, the technician version is intended for use by ancillary radiology personnel and omits capabilities such as the reading workflow. In previous releases both versions looked the same, and so a technician would see the workflow buttons, but not be able to click them. In the 1.9.5 release this difference is made explicit – the technician version has a simplified configuration, and a “picker” model where the reading workflow is replaced simply by a configurable list of hanging protocols which can be selected.
In the technician mode, the “workflows” section of the user configuration is replaced with a “static” section which allows the configuration of the enabled hanging protocols:
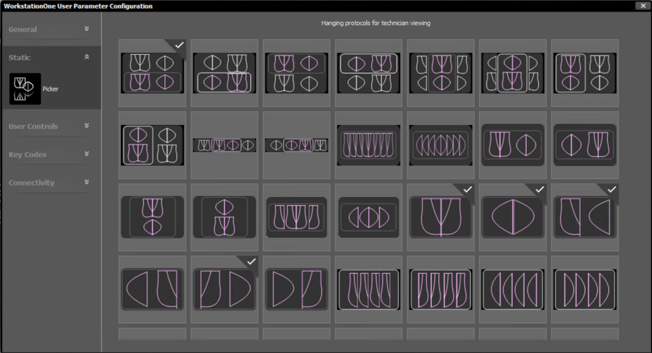
Where any HP can be selected by a left click on that icon, which results in a checkmark appearing (or being removed) from the corner of that icon. Each checked HP is then shown on the palette at the bottom right side of the image screens and is thus available for use when any case is open:

Which shows a row of hanging protocols, with no workflow buttons below it. To the left, the image thumbnails and tool buttons appear just like the professional version:
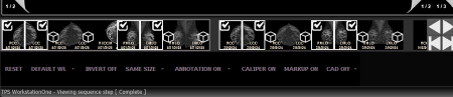
The image thumbnails operate the same as for the professional version – any can be dragged to a viewport, and a right-click menu provides additional actions.
Similarly, any displayed HP can be clicked, which causes the display to change to that layout and to be populated from the currently open case. For example, clicking the 2xMLO HP:
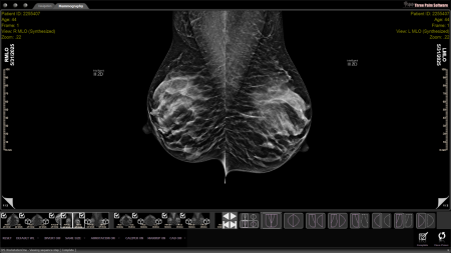
Image tools, including the context menus, operate the same as for the professional version
The Technician license thus allows all images to be viewed, but without the benefit of a built-in workflow. The user must manually click HP to view sets of images (along with the “page flip” corner icon, drag and drop, and the “more priors” button). The checkmarks on the thumbnails allow the viewer to know which images have been viewed, and the “checkmark” action button at the lower right of the screen allows a case to be marked as complete (and closed).