Three Palm Software announces WorkstationOne 1.9.2
Carmel, CA, 22 August 2023
The 1.9.2 release of WorkstationOne is now available for customer installs. Short descriptions of the changes in this release are included in the release notes which are available to all customers, with a longer description of the new mechanisms contained in the July 2023 customer newsletter. The major enhancements in this release are highlighted below.
Workflow configuration
Overview
The most obvious change in the 1.9.2 release is the updated user configuration dialog. This change was precipitated by the update to the reading workflow capability, to allow arbitrary duplication of steps. By default, although the user interface looks slightly different, all the same settings are carried over from earlier releases (automatically).
Configuration basics
As before, the configuration dialog is displayed by clicking the second (top left) button. This results in display of the dialog:
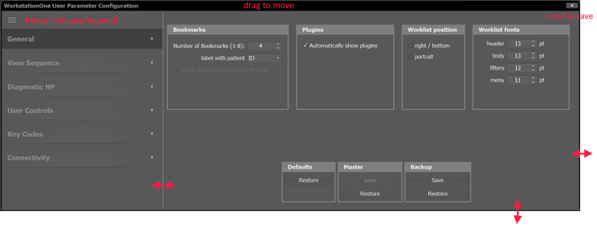
This dialog can be resized by moving the mouse over the edges, and it can be moved by clicking and dragging the title bar. The menu area (left side) can be resized separately and can be collapsed and expanded using the “hamburger” icon at the top left. The dialog can be closed using the top-right “x” or the “escape” key, and closing the dialog saves the settings.
The configuration items are grouped as in previous releases into the sections: “General”, “View Sequence”, “Diagnostic HP”, User Controls”, “Key Codes”, and “Connectivity”. The settings for each are viewed by clicking the item in the menu, resulting in the right panel updating to show those settings. The “View Sequence” option is more complex (see below) as it results in a sub-menu of steps.
More details on the configuration options can be found in the user manual (chapter 8), and here we focus on the new capabilities only.
View Sequence
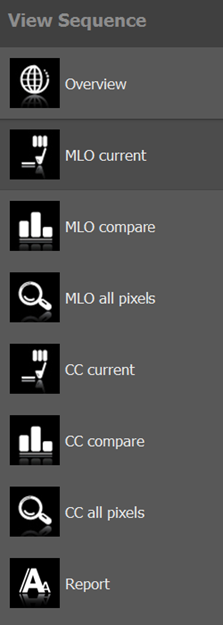
When the “View Sequence” menu item is clicked, that section expands – by default showing:
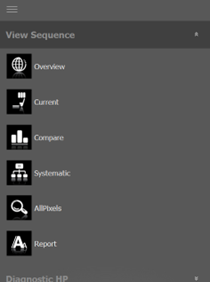
Which shows the default workflow steps: Overview, Current, Compare, Systematic, AllPixels and Report (in that order). The order (from top to bottom) indicates the order that the steps are executed. When selected, each item (“View Sequence”, “Overview”, etc) displays corresponding settings to the right – for “View Sequence” those are setting for the whole workflow, whereas for the specific steps, those are settings for that step. For example, when the “Systematic” step is selected:
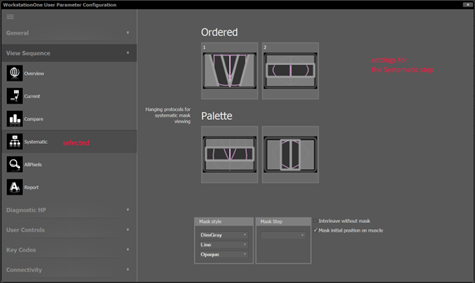
i.e., the right panel is specific to that step. For most steps, the settings are the same as previous releases, but organized differently (for example, the “gear” icon/menu has been removed, and step and HP specific settings are displayed within that panel).
The key difference (enhancement) is on the step addition/removal and ordering – which are actions that are performed using the left (main) menu. When the mouse is hovered over the “View Sequence” menu item:

A “+” sign appears. Clicking the plus sign results in the display of a dialog that then allows the addition of a step to the workflow:
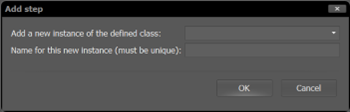
Where the first drop-down allows selection of one of the supported step types (Overview, Current, Compare, Systematic, AllPixels and Report). The step can be given an arbitrary (unique) name. That step is then added to the end of the workflow.
Hovering the mouse over any of the workflow steps results in additional buttons appearing:

Where the up and down arrows allow the step to be moved earlier or later in the workflow, and the “x” button allows the step to be removed. For example, if I wanted to see all the MLO images before looking at all the CC images, I would configure the workflow to repeat the steps, with the MLO versions using those HP, and the CC versions using only CC HP:
Which shows a workflow of 8 steps, with MLO and CC versions of the “Current”, “Compare” and “AllPixels” steps – each set to use only that subset of HP.
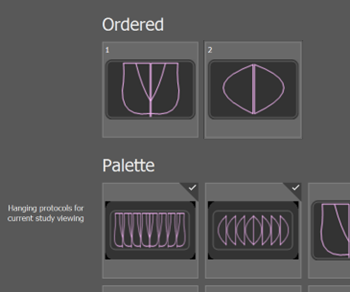
Some steps have additional HP available in this release, but the general model for each of the step types is that the HP are organized visually – an “ordered” set of HP (which form the sub-steps within that step), and a “palette” of HP from which those steps can be selected, and which can optionally be made available on the image screens for ad hoc selection.
For steps that support multiple HP (“Current”, “Compare”, “Systematic” and “AllPixels”) the ordering of the HP is accomplished by dragging the HP to the desired order (left to right within the step) and to/from the palette. For those steps a palette item can be right clicked to select it (shown with a checkmark) which means it is available at the bottom of the screen. For example:
Connectivity settings
Some additional functionality has been made available to the user on the connectivity tab:
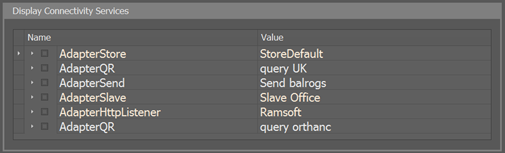
Which at first glance is much the same information that was displayed in the prior releases. However there is some added capability now. The items listed in this area are the configured connections (for example to PACS) with each connection having a type (listed in the “Name” column) and a “value” which is how that instance is known. The items are shown in one of two colors – white for those that can be checked and off-white for those that cannot be checked (generally the ones that can be checked are ones supporting a DICOM echo). To the left, each item has a “right arrow” and a checkbox. The “right arrow” results in that item expanding to list all its parameters – e.g., to find out what AE title and port the default storage listener is using:
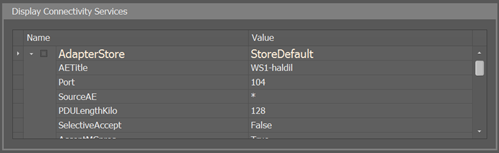
i.e., in this case the local AE title is “WS1-haldil” and the port is 104.
For items shown in white, clicking the checkbox results in the system checking that connection – with a “please wait” dialog shown while that is in progress. Once the check of that connection completes, the background of that item turns green or red, indicating whether that connection is “alive”. For example, after checking the configured destinations (3) here:
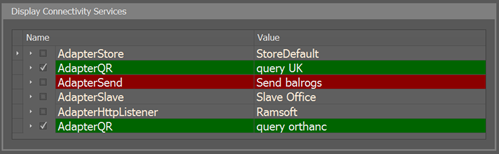
i.e., the connections called “query UK” and “query orthanc” are fine (both checked and green background) but the “Send balrogs” connection is not OK (not checked and shown with a red background). A history of these checks is shown in the notification area (bell icon).
While the capabilities added were previously present within the service tools, this allows the user to check immediately at any time, and if needed to be able to locate the connection information without involvement of service personnel.
Summary
While changes to the user configuration settings at first appear extensive, the reality is that all settings are preserved, with additional capability available to those that need it.
CAD/AI enhancements
OVERVIEW
Changes in CAD/AI support for the 1.9.2 release are incremental – but some items are visible to the end user.
Typical for a new release is that the latest CAD-SR from each vendor is supported, plus support for a small set of new vendors since the 1.9.1 release. With the increasing number of vendors, and the additional meta-data supplied by those vendors, there is a desire to make more of it available on the worklist. Thus, this release introduces 4 columns that can be shown on the worklist, with information populated from the CAD-SR, with different formatting of that information for each vendor.
Worklist columns
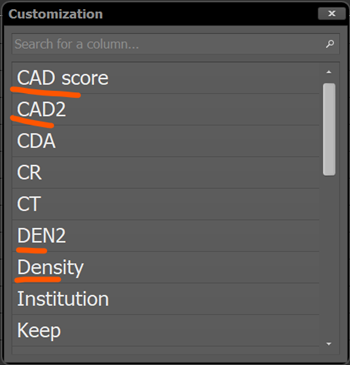
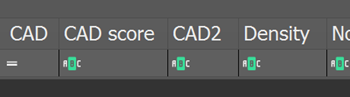
The names of the four available columns can be configured using the service tool. The default 4 column names are “CAD score”, “CAD2”, “Density” and “DEN2”. The user can add these to the worklist from the “column chooser” (here with the default names):
Resulting in:
As CAD arrives for each case, the back-end scans the SR, and extracts information for the corresponding vendor. That is then formatted using the configured mappings for that vendor and placed into the corresponding columns on the worklist.
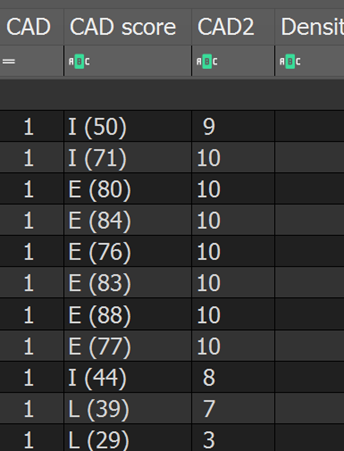
For example, for an iCAD example, the worklist shows:

So, both a score and a density value are shown for that case. These values are also displayed on the image corners when the case is open, and CAD turned on.
Similarly, for a ScreenPoint Transpara (1.7.3) example, the same worklist shows:
i.e., in this case there is a primary “CAD score” (the letter grade plus 1-99 value) plus a 1-10 grade (in the CAD2 column). Again, these values are shown in the image corners when the corresponding case is open, and CAD turned on.
In most cases this information is also supplied by the CAD/AI vendor in secondary capture images, which are by default shown in the “document” plugin (so available on the navigation screen when the case is open).
With this expanded support (4 columns rather than the previous 1) more information can be used (when available from CAD/AI) for sorting and grouping cases (triage) in the worklist.
Configuration
This expanded support is enabled by default, but it is the user who controls which columns are to be shown on that user’s worklist (each user of the system can be different). Configuration at the system level is performed by service personnel, and consists of two parts:
- Enabling of the “score extraction” mechanism and corresponding per-vendor mappings. This is achieved using the “database” tab of the be-config service tool and is described further in section 7.1.10 of the service manual for release 1.9.2. The default mappings are listed there also but can be changed on site.
- Re-naming of the score columns – this is achieved using the “App-config” service tool (display tab) – see section 8.1.4.4 of the service manual for the 1.9.2 release.
Summary
Updates to support new vendors are included in each new release of WorkstationOne, with at least one new vendor added in 1.9.2. Existing vendors have updated their SR, with WorkstationOne correspondingly updated to extract and display that information, with the major new piece being up to 4 columns on the worklist. Pre-defined extraction and mappings for those columns are provided for 11 different vendors (listed in the service manual) with the mappings for each configurable. Additionally, the system provides the ability to define mappings for vendors not included by default (so vendors not in the initial 11 can still be supported via configuration settings).